As an Amazon Associate I earn from qualifying purchases.
Like most people, you probably think connecting your Nintendo Switch to wifi is a complicated process. Well, I’m here to tell you that it’s not! In fact, it’s really quite simple – all you need is your username and password.
In this blog post, I’m going to walk you through the process of connecting your Nintendo Switch to wifi step-by-step. By the end of this post, you’ll be online and ready to play your favorite games in no time. So let’s get started!
Contents
Introduction
In order to connect your Nintendo Switch console to the internet, you will need to have access to a wireless network that uses the 802.11ac standard and that uses WPA2 security. Once you have connected your console to the internet, you can head to the Nintendo eShop and start downloading games!
What you need
- Your Nintendo Switch console
- A wireless router that supports 802.11ac (5 GHz) with WPA2 security
- An internet connection
- The latest system update for your Nintendo Switch console
- A wireless access point or wireless modem/router (if you want to connect wirelessly)
Connecting your Nintendo Switch to Wi-Fi
If you want to take your Nintendo Switch online, you need to connect it to the internet. Here’s how to do it.
1. From the Home screen, select System Settings.
2. Scroll down and select Internet, then Internet Settings.
3. Select Connect to the Internet, then Yes.
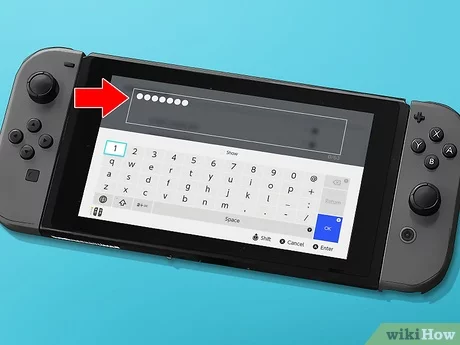
4. Select your wireless network from the list of available networks. If prompted, enter your password.
5. Once your Switch is connected, you’ll be able to access online features like Nintendo eShop and multiplayer games.
Troubleshooting
If you’re having trouble connecting your Nintendo Switch to WiFi, you can try a few things.
First, ensure your router is turned on and the WiFi network is active. You should also check to see if there are any other devices connected to the network that may be causing interference.
If your router is configured to use a static IP address, you may need to provide the Nintendo Switch with this information in order to connect. To do this, open the System Settings menu on the Nintendo Switch and select “Internet,” then “Internet Settings.” Select “Manual Configuration” and enter the IP address, subnet mask, default gateway, and DNS servers that have been assigned to your router.
You may need to contact your internet service provider for help if you’re still having trouble connecting.
Tips and Tricks
Have trouble connecting your Nintendo Switch to the internet? Here are some tips and tricks that might help.
First, make sure that your Nintendo Switch is within range of your wireless router. If it is, try moving closer to the router and see if that helps.
Next, check to see if there’s anything blocking the wireless signal, like metal objects or walls. If so, try moving the router closer to where you want to use your Nintendo Switch or use a different location altogether.
If you’re still having trouble, restart both your Nintendo Switch and your wireless router. Sometimes that’s all it takes to get things working again.
Still no luck? Try connecting using a wired connection with an Ethernet adapter. This can be especially helpful if you’re trying to connect to Wi-Fi at a public place like a coffee shop or airport.
Finally, you can try contacting Nintendo’s customer support for more help if all else fails.
FAQs
How do I connect my Nintendo Switch to the Internet?
In order to connect your Nintendo Switch to the Internet, you will need to have a wireless router connected to an Internet service provider. Please see the system’s instruction manual for more information on connecting your Nintendo Switch to a wireless router.
What is the Wii U Game Pad’s maximum range?
The Wii U GamePad has a maximum range of about 25 feet.
What is the Wii U Pro Controller’s maximum range?
The Wii U Pro Controller has a maximum range of about 50 feet.
Conclusion

To connect your Nintendo Switch to a Wi-Fi network, you’ll need to enter the password for the network. Once you’ve done that, the Switch will be connected to the internet, and you can start playing games online.
Further Reading
In order to connect your Nintendo Switch to a Wi-Fi network, you will need to know the network’s SSID (Service Set Identifier) and password. The SSID is the name of the Wi-Fi network you want to connect to. The password is case-sensitive and must be entered exactly as it is configured on the router or access point.
To connect your Nintendo Switch to a Wi-Fi network:
1. From the HOME Menu, select “System Settings.”
2. Scroll down and select “Internet,” then “Connect to the Internet.”
3. Select “Connection Type” and choose “Easy Setup.”
4. Choose the wireless network you wish to connect to from the list of available networks. If the wireless network you wish to connect to is not displayed, try manually entering the SSID and password.
5. Enter the password for the wireless network, then select “OK.”
6. If everything was entered correctly, your Nintendo Switch will now be connected to the Internet!
Amazon and the Amazon logo are trademarks of Amazon.com, Inc, or its affiliates.


