As an Amazon Associate I earn from qualifying purchases.
Contents
- 1 How to Repair a Damaged Nintendo Switch Screen
- 1.1 Step 1: Remove the Back Plate
- 1.2 Step 2: Remove the Metal Shield
- 1.3 Step 3: Disconnect the Battery
- 1.4 Step 4: Remove the Motherboard
- 1.5 Step 5: Remove the Damaged Screen
- 1.6 Step 6: Install the New Screen
- 1.7 Step 7: Reassemble the Switch
- 1.8 Where to Get the Necessary Tools and Parts?
- 1.9 Step 8: Test Your Switch
How to Repair a Damaged Nintendo Switch Screen
Before starting, please note that repairing your Nintendo Switch yourself might void your warranty, and if something goes wrong, you might permanently damage your device. If you’re not comfortable doing this, it’s best to send it to a professional for repair.
Materials you will need:
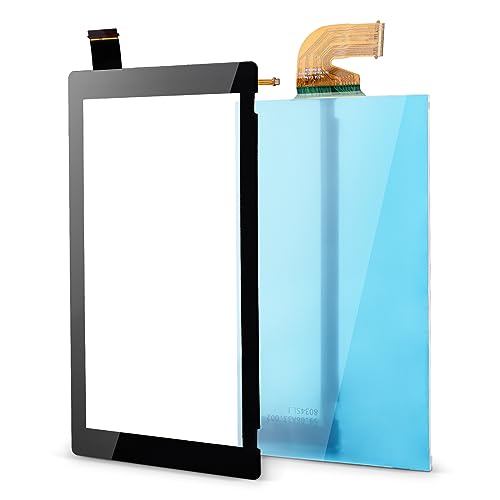
- Replacement Nintendo Switch LCD Screen
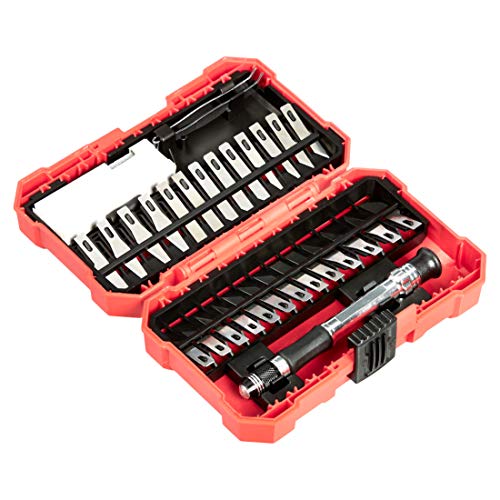
- Y00 Triwing screwdriver
- Phillips #00 screwdriver
- Plastic opening tools
- Tweezers
- Precision knife set (optional)


Step 1: Remove the Back Plate
- Turn off your Nintendo Switch and remove any game cartridges, memory cards, or controllers.
- Use the Y00 Triwing screwdriver to remove the four screws on the back corners of the Switch.
- Use the Phillips #00 screwdriver to remove the three screws from the top of the Switch, one screw from the bottom, and one screw from each side.
- Lift off the back plate gently using a plastic opening tool.
Step 2: Remove the Metal Shield
- Use the Phillips #00 screwdriver to remove the nine screws holding the large metal shield in place.
- Lift off the metal shield.
- Next, remove the three screws securing the smaller metal shield on the left and remove the shield.
Step 3: Disconnect the Battery
- Carefully lift up the battery connector using tweezers to disconnect the battery from the motherboard.
Step 4: Remove the Motherboard
- Use the Phillips #00 screwdriver to remove the eight screws securing the motherboard.
- Use a plastic opening tool to disconnect the four ribbon cables connected to the motherboard.
- Lift the motherboard out of the Switch case.
Step 5: Remove the Damaged Screen
- Remove the four screws securing the metal bracket to the screen.
- Use a plastic opening tool to carefully separate the screen from the Switch case. Be careful, as the screen may still be adhered to the case. You may need a precision knife to cut the adhesive.
Step 6: Install the New Screen
- If there is any adhesive residue on the Switch case, remove it.
- Apply new adhesive strips to the case if your replacement screen did not come with them.
- Place the new screen onto the case.
- Reinstall the metal bracket over the screen and screw it into place.
Step 7: Reassemble the Switch
- Place the motherboard back into the Switch case.
- Reconnect the four ribbon cables to the motherboard.
- Screw the motherboard back into place.
- Reconnect the battery.
- Replace the small and large metal shields and screw them into place.
- Replace the back plate of the Switch and screw it into place.
That’s it! Your Nintendo Switch should now have a brand new screen.
Where to Get the Necessary Tools and Parts?
You can find most of these tools and parts on Amazon, eBay, or specialized electronic repair websites. Here are some suggestions:
Please, be careful and make sure to place the screws in a safe place as you remove them. There are many, and they are very small and easy to lose.
Step 8: Test Your Switch
- Turn on your Nintendo Switch.
- Check the functionality of your new screen by navigating through menus and running a game to ensure that the display is functioning correctly.
Troubleshooting:
- If the Switch does not turn on: Make sure the battery connector is properly connected to the motherboard. If it still doesn’t turn on, the battery might be dead – try charging your Switch.
- If the touch screen isn’t working: Make sure all the ribbon cables connecting the screen to the motherboard are properly connected.
Congratulations, you’ve successfully replaced the screen on your Nintendo Switch!
Amazon and the Amazon logo are trademarks of Amazon.com, Inc, or its affiliates.