As an Amazon Associate I earn from qualifying purchases.
If you’re having trouble changing your Nintendo Network ID, don’t worry! Here are some tips on how to do it.
Contents
- 1 How to change your Nintendo Network ID on your Nintendo Switch
- 2 How to change your Nintendo Network ID on your Wii U
- 3 How to change your Nintendo Network ID on your Nintendo 3DS
- 4 How to change your Nintendo Network ID password
- 5 How to change your Nintendo Network ID email address
- 6 How to change your Nintendo Network ID user name
- 7 How to change your Nintendo Network ID country
- 8 How to change your Nintendo Network ID language
How to change your Nintendo Network ID on your Nintendo Switch
If you want to change your Nintendo Network ID on your Nintendo Switch, there are a few things you need to do. First, you’ll need to create a new Nintendo Network ID using a different email address than the one associated with your current NNID. Once you’ve done that, you can link your new NNID to your Nintendo Switch console through the System Settings menu.
From there, you can unlink your old NNID from the console and start using your new one. Keep in mind that any content purchased with your old NNID will still be tied to that account; if you want to use that content with your new account, you’ll need to contact Nintendo customer support for assistance.
How to change your Nintendo Network ID on your Wii U
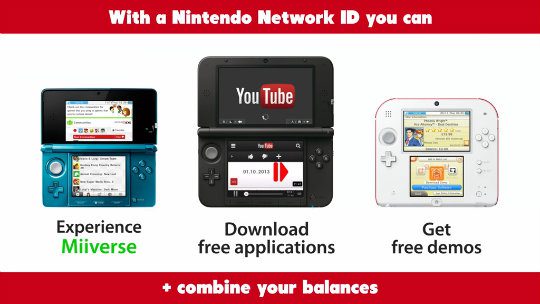
Your Nintendo Network ID is the username you use to access many of Nintendo’s online services. It’s also used as your Mii’s name in certain games that support Miis.
You can change your NNID at any time from your Wii U console. Here’s how:
- From the Wii U Menu, select “System Settings.”
- Select “Initialize / Reset.”
- Select “Reset Console Information and Delete everything.”
Enter your 4- or 8-digit PIN when prompted. This is the same PIN you use to unlock parental controls. If you don’t know your PIN, select “Forgot PIN?” to reset it. - Once you’ve entered your PIN, select “Erase Everything.”
- Confirm that you want to erase all data by selecting “Yes” twice.
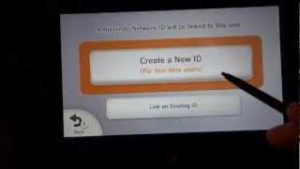
- Now that all of your console’s data has been erased select “Create New Nintendo Network ID.”
- Enter and confirm a new NNID for yourself. That’s it! Your new NNID will now be associated with your Wii U console.
How to change your Nintendo Network ID on your Nintendo 3DS
Your Nintendo Network ID is the username you use to access various Nintendo services, such as online play, downloading games from the eShop, and accessing official Nintendo websites.
You can change your Nintendo Network ID (NNID) on your Nintendo 3DS family system by going to Settings > Other Settings > Profile > Username. Please note that once you change your NNID, you will not be able to revert back to your previous NNID.
If you have a linked NNID and Wii U console, you can also change your NNID on the Wii U by going to Settings > Users > Account Information > Profile > Username.
How to change your Nintendo Network ID password
Your Nintendo Network ID is the account you use to access Nintendo eShop and other online features for your Wii U or Nintendo 3DS family system. You can find your NNID by tapping “System Settings” from the HOME Menu of your Wii U or Nintendo 3DS family system, then selecting “Internet,” and finally “Nintendo Network ID Settings.” If you forget your password, don’t worry! You can easily reset it by following these steps:
First, go to https://id.nintendo.net and log in with your NNID username and password. If you’ve forgotten your password, select “Forgot Password?” on the login screen and follow the instructions.
Once you’re logged in, select “Change Password” from the menu on the left side of the page. Enter your new password twice, then click “Submit.” Please note that your new password must be at least 8 characters long and include at least one number.
That’s it! Your new password will now work when logging in to any Nintendo service, including Nintendo eShop on Wii U and Nintendo 3DS family systems.
How to change your Nintendo Network ID email address
You can change the email address associated with your Nintendo Network ID (NNID) in two ways. The first is to do it directly through your NNID account settings, and the second is to contact Nintendo customer support and have them make the change for you.
To change your email address through your NNID account settings:
1. Sign in to your NNID account on Nintendo’s website.
2. Click “Edit Profile.”
3. Enter a new email address in the “Email Address” field.
4. Click “Save.”
5. A confirmation message will be sent to the new email address you entered; follow the instructions in that message to complete the process.
If you’re having trouble changing your email address yourself, or if you need to change it back to an old one for some reason, you can contact Nintendo customer support, and they’ll be able to help you out.
How to change your Nintendo Network ID user name
Your Nintendo Network ID is the user name you use to access certain online features on your Wii U or Nintendo 3DS system. You can change your user name once for free.
If you want to change your user name, follow these steps:
1. Select “System Settings” from the HOME Menu.
2. Scroll down and select “Accounts.”
3. Select “Nintendo Network ID Settings,” then “Change User Name.” (You may be asked to enter your password.)
4. Enter the new user name that you would like, then select “OK.” (Be sure to check spelling and spacing before confirming!) If you’d like, you can also enter a message that will be displayed next to your user name whenever it’s shown in online play or on Miiverse™. This message can be up to 48 characters long, and can include spaces.
5. After reading the information about linked software and data, select whether or not you would like to unlink your NNID from any linked software and data on this console or any other linked consoles (including handheld systems), then select “Continue.”
6. When prompted, enter your date of birth using the arrows on the left side of the screen, then press (A).
7-9: Read over the information about changing your NNID again, then press (A) if you would still like to proceed with changing your NNID user name at this time…10: …or press (B) if you’ve changed your mind and would like to keep using your current NNID user name
How to change your Nintendo Network ID country
If you’re moving to a new country and want to take your Nintendo Network ID (NNID) with you, you can change the country associated with your account. Here’s how:
1. From the HOME Menu, select System Settings.
2. Scroll down and select System.
3. Scroll down and select Change Country/Region Setting under Other Settings.
4. Select Yes when prompted if you’d like to change your region setting or create a new NNID for this region. If you choose No, your existing NNID will remain unchanged, and any unclaimed content will be lost.
5. Enter the password for the Nintendo Account that’s linked to this console, then select Next > New Region > Confirm > Save Changes > OK once more on the next screen that appears.. You’ve now changed the country/region setting for your Nintendo Network ID! Please note that certain content may not be available in all regions due to licensing restrictions
How to change your Nintendo Network ID language
If you want to change the language of your Nintendo Network ID, there are a few steps you need to follow. First, log in to your account on the official Nintendo website. Next, go to the “My Profile” section and select the “Edit Profile” option. From there, you will be able to change the language of your Nintendo Network ID from English to any other supported language. Finally, click the “Save Changes” button, and your new language preference will be saved.
Amazon and the Amazon logo are trademarks of Amazon.com, Inc, or its affiliates.